Difference between revisions of "Terraform"
(Formated, moved pics and text around, added info about tera-block, replaced some outdated stuff.) |
(Images no longer load from github.) |
||
| (23 intermediate revisions by 7 users not shown) | |||
| Line 1: | Line 1: | ||
| − | All [[ | + | All [[Unit classes#Constructor|construction units]], [[Commander]]s and [[Caretaker]]s can modify the terrain in Zero-K by paying [[Metal]] and [[Energy]]. Terraform has many shapes and applications but not all are needed all the time. This page is roughly sorted from the most common forms of terraform to the most complex. |
| − | + | <div style="float:right;"><youtube>//www.youtube.com/watch?v=9pSigOsGJeo</youtube></div> | |
| + | [[File:Intro terraform.png]] | ||
| − | == Terraform | + | == Terraform Presets == |
| + | The quickest way to terraform is with a preset height command. These are hotkeys that raise/lower the terrain by some amount, or level it to a particular height. The default presets are as follows. | ||
| − | + | [[File:TerraPresetsSmall.png]] | |
| + | {{:Terraform hotkeys}} | ||
| + | To select a preset ensure that you have a constructor selected and press the hotkey. The cursor should turn into a terraform icon. Release the hotkey then click and drag the mouse to draw a shape. A single click will create a spike or hole, while a dragged line creates a wall/trench. The selected constructors will then work on terraform in that shape, with height being determined by the preset. | ||
| − | + | Heights and hotkeys can be tweaked via Terraform Preset Hotkeys section of Hotkeys/Construction in the in-game menu ({{key press|F10}}). | |
| − | |||
| − | |||
| − | |||
| − | |||
| + | == Raising and Lowering Structures == | ||
| + | [[File:RaiseStructure.png|thumb]] | ||
| + | Many structures benefit from being raised on a spike or sunk into a hole. This terraform has to be completed before the building is constructed. To select the height of a structure, first select it from the build options (so that the ghost is on the mouse cursor), then do one or both of the following. | ||
| + | * Press {{Key press|B}} to enable pre-terraforming, then press {{Key press|C}} and {{Key press|V}} to adjust the height up and down. | ||
| + | * Hold {{Key press|Alt}} and scroll the mouse wheel to adjust the height up and down. | ||
| + | The height of the structure is indicated by a green rectangle. Once the height is set, place the structure. A terraform command will be queued for selected constructors in front of the structure command. | ||
| − | + | The height you last set for each structure type is remembered by the interface, even between games. This system can also be used to place structures in areas that would otherwise be too steep. The hotkeys for height changing can be set in the Terraform Structure Placement section of Hotkeys/Construction in the in-game menu ({{key press|F10}}). | |
| − | + | {{See|Structure Placement}} | |
| − | + | = Full Terraform Commands = | |
| − | + | The full terraform commands can be found at the bottom of the 'Special' tab in the command menu. There are five types. | |
| − | + | === Ramp === | |
| + | [[File:RampLevelRaise.png|thumb]] | ||
| + | [[File:ramp.png]] | ||
| − | + | '''Ramp''' creates a slope between two points. It is not drawn as a shape in the same way as each of the other commands. To make a simple ramp do the following. | |
| − | + | * '''Left-click''' and hold the mouse where you want the ramp to start. | |
| + | * '''Drag''' the mouse to where you want to end the ramp, and '''release'''. | ||
| + | * Move the mouse to set ramp width, then '''Left-click''' again. | ||
| − | + | The colour of the ramp indicates what will be able to climb it: green for vehicles, yellow for bots, and red for spider-only. Ramps can be made between any points in space, not just the ground. More advanced ramps are covered below. | |
| − | |||
| − | |||
| − | |||
| − | |||
=== Level === | === Level === | ||
| + | [[File:level.png]] | ||
| − | + | '''Level''' sets terrain in an area to exactly the same height. The result will always be flat. | |
| − | |||
| − | '''Level''' | ||
| − | |||
| − | |||
| − | |||
| − | |||
| − | |||
| − | |||
=== Raise === | === Raise === | ||
| + | [[File:SmoothRestore.png|thumb]] | ||
| + | [[File:raise.png]] | ||
| − | + | '''Raise''' raises or lowers the terrain in an area by the same amount. The relative height of the terrain within the area is not changed. | |
| − | + | === Restore === | |
| + | [[File:restore.png]] | ||
| − | + | '''Restore''' reverts the height of the terrain to what it was at the start of the game. | |
| − | |||
| − | |||
=== Smooth === | === Smooth === | ||
| + | [[File:smooth.png]] | ||
| − | + | '''Smooth''' flattens sharp edges of the terrain. Hills and cliffs are blunted. Smooth is useful for joining ramps together. | |
| − | '''Smooth''' | + | == Height Selection == |
| + | [[File:Setheight terraform.jpg|thumb]] | ||
| + | The height of full '''Level''' and '''Raise''' commands is selected by moving the mouse up or down after the shape is set. '''Restore''' and '''Smooth''' do not have height selection, while '''Ramp''' commands are issued in a different way. | ||
| − | + | '''Level''' height selection has the following modifiers. | |
| + | * Hold {{Key press|Alt}} to snap to either the starting height, just below water level (so that ships can't pass) or the level just below water level that land units cannot pass (23 deep). | ||
| + | * Hold {{Key press|Ctrl}} and move the mouse to select the height to be leveled to from terrain by mousing over the terrain. | ||
| − | + | '''Raise''' height selection has the following modifiers. | |
| − | + | * Hold {{Key press|Alt}} to snap to heights by steps of 6. A 6 high (or deep) wall (or trench) will be impassable to vehicles but passable to bots. An 18 high wall will be impassable to bots. | |
| − | ''' | + | * Press {{Key press|Ctrl}} to reset the height to 0. |
| − | |||
| − | * | ||
| − | |||
| − | |||
| − | + | Additionally, pressing {{Key press|Space}} at any time during a '''Ramp''', '''Level''', '''Restore''' or '''Smooth''' command toggles through 'Only Raise' and 'Only Lower'. This tells the command to avoid removing terrain or to avoid adding it. | |
| − | + | == Drawing Shapes == | |
| + | [[File:Lasso terraform.jpg|thumb]] | ||
| + | The first step of a '''Level''', '''Raise''', '''Smooth''' or '''Restore''' command is to draw a shape. | ||
| − | + | [[File:level.png]] [[File:raise.png]] [[File:smooth.png]] [[File:restore.png]] | |
| − | + | The simplest shapes are the line and the blob. '''Left-click''' on the ground and hold the mouse to start drawing a line. | |
| − | + | * If the two ends of the line meet, then the area enclosed by the line will be terraformed. | |
| − | + | * Otherwise, the line is thickened and used as the terraform area. | |
| − | + | '''Left-click''' without holding draws a point, which is then thickened into a 2x2 box like a line terraform. | |
| − | * | ||
| − | |||
| − | |||
| + | The modifiers {{Key press|Alt}} and {{Key press|Ctrl}} can be used to draw different shapes. | ||
| + | * Hold {{Key press|Alt}} then '''Left-click and drag''' to terraform filled a rectangular area. | ||
| + | * Hold {{Key combo|Alt|Ctrl}} then '''Left-click and drag''' to terraform hollow rectangle. | ||
| + | * Hold {{Key combo|Alt|Ctrl}} then '''Left-click''' on a building or unit to create a wall around that unit. | ||
* Hold {{Key press|Ctrl}} at any time during line drawing to create a straight section of line. Straight and non-straight lines can be mixed by pressing and releasing {{Key press|Ctrl}}. | * Hold {{Key press|Ctrl}} at any time during line drawing to create a straight section of line. Straight and non-straight lines can be mixed by pressing and releasing {{Key press|Ctrl}}. | ||
| − | + | All shape drawing modifiers can be used with terraform presets. For example, to quickly wall off a structure you could press {{Key combo|Alt|M}} then hold {{Key combo|Alt|Ctrl}} and '''Left-click''' the structure. | |
| − | == | + | == Advanced Ramp == |
| + | [[File:Ramp1.sized terraform.jpg|thumb]] | ||
| + | The full '''Ramp''' can make a slope between any two points above or below the terrain. Here is the process. | ||
| + | * Hold {{Key press|Ctrl}} and '''Left-click and drag''' to set the start height, then '''release'''. If you want to start at the height of the terrain, then just '''Left-click'''. | ||
| + | * '''Move''' the mouse to where you want to end the ramp, without holding any buttons. | ||
| + | * '''Left-click and drag''' to set the end height, then '''release'''. | ||
| + | * '''Move''' the mouse to set the width, then '''Left-click''' to issue the command. | ||
| − | + | A few modifiers are available. | |
| − | + | * Hold {{Key press|Alt}} instead of {{Key press|Ctrl}} for the first click to snap the height to just below water level, which is helpful for getting hovercraft out of the water. | |
| − | + | * Hold {{Key press|Alt}} when setting the height of the end of the ramp to snap to useful heights and gradients. These are the maximum bot pathable slopes, the maximum vehicle pathable slopes, flat, the original ground height, and just below water level. | |
| − | |||
| − | |||
| − | |||
| − | |||
| − | |||
| − | |||
| − | |||
| − | |||
| − | |||
| − | |||
| − | |||
| − | |||
| − | |||
| − | |||
| − | |||
| − | |||
| − | * {{Key press| | ||
| − | |||
| − | |||
| − | |||
| − | |||
| − | |||
| − | |||
| − | |||
| − | |||
| − | |||
| − | |||
| − | |||
| − | |||
| − | |||
| − | |||
| − | * Hold {{Key press|Alt}} when | ||
| − | |||
| − | |||
| − | |||
| − | |||
| − | |||
| − | |||
The ramp colour indicates whether all units will be able to use it, if vehicles/tanks will not be able to use it and if only spiders can use it. | The ramp colour indicates whether all units will be able to use it, if vehicles/tanks will not be able to use it and if only spiders can use it. | ||
| + | <gallery mode="packed" widths="240px" heights="280px"> | ||
| + | File:Ramp green terraform.jpg|Green: Every land unit can use. | ||
| + | File:Ramp yellow terraform.jpg|Yellow: Too steep for vehicles. | ||
| + | File:Ramp red terraform.jpg|Red: Only spiders can climb. | ||
| + | </gallery> | ||
| − | + | = Construction Cost = | |
| − | |||
| − | |||
| − | |||
| − | |||
| − | + | A few factors determine terraform cost so it is difficult to estimate precisely. Here are some common shapes that all cost around 300 metal and energy. | |
| − | + | [[File:Terraform300Cost2.png]] | |
| − | + | Large terraform shapes are split up into segments which track cost and progress independently. The cost of a segment has three parts: | |
| + | * A small base cost, paid before any terrain is moved. | ||
| + | * A relatively high cost on height added or subtracted around the edge of the shape, capped at a height of 14. | ||
| + | * A cost per volume added or subtracted. The volume cost is paid for the buttress that builds up around large height differences as well. | ||
| + | The costs are balanced to make a wide range of interesting terraform shapes balanced and cost effective. The perimeter cost keeps bulky areas reasonably priced compared to thin walls, and the height cap on thin walls allows short vehicle-blocking walls to be relatively expensive for the volume they move. The main cost of thin high spires or deep holes is the volume cost for all the buttressing. | ||
| − | == | + | == Combat Construction == |
| − | + | Terraform takes 20× longer if you can see an enemy unit or structure near the terraform construction point. The area around the point is always large enough to cover the whole segment. This prevents most uses of terraform in close quarters combat (burying enemies etc), but still allows walls and holes to be dug for damage mitigation in long range exchanges. A tanky structure, such as a [[Razor]], can be placed on a wall to stop enemies tearing it down with constructors, although it will only block weapon-based deformation under its footprint. | |
| − | [[Image: | + | [[Image:Tera block.png]] |
| − | + | = Tips = | |
| − | You can protect | + | You can protect structures that don't care whether they are underground, such as [[Cornea|cloak]]/[[Aegis|shield generators]], [[Caretaker|nanoturrets]], [[Gunship Plant]]s and [[Missile Silo]]s, with walls or holes. |
| − | Buildings cannot be moved vertically once placed. If you want to put a [[Fusion Reactor|Fusion]] in a hole for safety the hole will have to be built before the Fusion. | + | Buildings cannot be moved vertically once placed. If you want to put a [[Fusion Reactor|Fusion]] in a hole for safety the hole will have to be built before the Fusion. |
| − | [[Big Bertha]]s, [[Crab]]s and [[Ogre]]s are very good at knocking down walls. [[Quake]] missiles are the ultimate solution against landscape designers. | + | [[Big Bertha]]s, [[Crab]]s and [[Ogre]]s are very good at knocking down walls. [[Quake]] missiles are the ultimate solution against landscape designers, and are even able to move buildings vertically. |
| − | + | [[File:Crabesmooth.sized terraform.jpg]] | |
You can use terraforming to make a trench or wall underwater to stop amphibious bots. | You can use terraforming to make a trench or wall underwater to stop amphibious bots. | ||
| Line 168: | Line 145: | ||
[[Lobster|Lobsters]] can throw units over low walls. | [[Lobster|Lobsters]] can throw units over low walls. | ||
| − | Terraform ramp can be used with [[Newton]]s [[ | + | Terraform ramp can be used with [[Newton]]s [[Newton Firezones|to fire units at the enemy]]! |
| + | |||
| + | [[File:Newtonramp.sized terraform.jpg]] | ||
| − | |||
| − | |||
{{Navbox manual}} | {{Navbox manual}} | ||
Latest revision as of 19:01, 14 February 2024
All construction units, Commanders and Caretakers can modify the terrain in Zero-K by paying Metal and Energy. Terraform has many shapes and applications but not all are needed all the time. This page is roughly sorted from the most common forms of terraform to the most complex.

Contents
Terraform Presets[edit]
The quickest way to terraform is with a preset height command. These are hotkeys that raise/lower the terrain by some amount, or level it to a particular height. The default presets are as follows.

- Alt + V: Cheaply stops vehicles from passing, while letting bots pass.
- Alt + B: Cheaply stops bots and vehicles from passing.
- Alt + N: Protects small to medium sized units from direct fire while allowing nearby turrets to shoot. This allows indirect fire units like Rogue or Recluse to shoot at a Stinger with impunity.
- Alt + M: Raises to a height that blocks direct fire and most indirect fire too.
- Alt + G: Levels terrain to the height of the ground at the clicked location.
- Alt + H: Raises tall spire to give high ground advantage for units like Crab.
- Alt + J: Makes a deep hole, which can be useful for hiding in a pinch.
To select a preset ensure that you have a constructor selected and press the hotkey. The cursor should turn into a terraform icon. Release the hotkey then click and drag the mouse to draw a shape. A single click will create a spike or hole, while a dragged line creates a wall/trench. The selected constructors will then work on terraform in that shape, with height being determined by the preset.
Heights and hotkeys can be tweaked via Terraform Preset Hotkeys section of Hotkeys/Construction in the in-game menu (F10).
Raising and Lowering Structures[edit]

Many structures benefit from being raised on a spike or sunk into a hole. This terraform has to be completed before the building is constructed. To select the height of a structure, first select it from the build options (so that the ghost is on the mouse cursor), then do one or both of the following.
- Press B to enable pre-terraforming, then press C and V to adjust the height up and down.
- Hold Alt and scroll the mouse wheel to adjust the height up and down.
The height of the structure is indicated by a green rectangle. Once the height is set, place the structure. A terraform command will be queued for selected constructors in front of the structure command.
The height you last set for each structure type is remembered by the interface, even between games. This system can also be used to place structures in areas that would otherwise be too steep. The hotkeys for height changing can be set in the Terraform Structure Placement section of Hotkeys/Construction in the in-game menu (F10).
- Further information: Structure Placement
Full Terraform Commands[edit]
The full terraform commands can be found at the bottom of the 'Special' tab in the command menu. There are five types.
Ramp[edit]


Ramp creates a slope between two points. It is not drawn as a shape in the same way as each of the other commands. To make a simple ramp do the following.
- Left-click and hold the mouse where you want the ramp to start.
- Drag the mouse to where you want to end the ramp, and release.
- Move the mouse to set ramp width, then Left-click again.
The colour of the ramp indicates what will be able to climb it: green for vehicles, yellow for bots, and red for spider-only. Ramps can be made between any points in space, not just the ground. More advanced ramps are covered below.
Level[edit]

Level sets terrain in an area to exactly the same height. The result will always be flat.
Raise[edit]


Raise raises or lowers the terrain in an area by the same amount. The relative height of the terrain within the area is not changed.
Restore[edit]

Restore reverts the height of the terrain to what it was at the start of the game.
Smooth[edit]

Smooth flattens sharp edges of the terrain. Hills and cliffs are blunted. Smooth is useful for joining ramps together.
Height Selection[edit]

The height of full Level and Raise commands is selected by moving the mouse up or down after the shape is set. Restore and Smooth do not have height selection, while Ramp commands are issued in a different way.
Level height selection has the following modifiers.
- Hold Alt to snap to either the starting height, just below water level (so that ships can't pass) or the level just below water level that land units cannot pass (23 deep).
- Hold Ctrl and move the mouse to select the height to be leveled to from terrain by mousing over the terrain.
Raise height selection has the following modifiers.
- Hold Alt to snap to heights by steps of 6. A 6 high (or deep) wall (or trench) will be impassable to vehicles but passable to bots. An 18 high wall will be impassable to bots.
- Press Ctrl to reset the height to 0.
Additionally, pressing Space at any time during a Ramp, Level, Restore or Smooth command toggles through 'Only Raise' and 'Only Lower'. This tells the command to avoid removing terrain or to avoid adding it.
Drawing Shapes[edit]

The first step of a Level, Raise, Smooth or Restore command is to draw a shape.
The simplest shapes are the line and the blob. Left-click on the ground and hold the mouse to start drawing a line.
- If the two ends of the line meet, then the area enclosed by the line will be terraformed.
- Otherwise, the line is thickened and used as the terraform area.
Left-click without holding draws a point, which is then thickened into a 2x2 box like a line terraform.
The modifiers Alt and Ctrl can be used to draw different shapes.
- Hold Alt then Left-click and drag to terraform filled a rectangular area.
- Hold Alt + Ctrl then Left-click and drag to terraform hollow rectangle.
- Hold Alt + Ctrl then Left-click on a building or unit to create a wall around that unit.
- Hold Ctrl at any time during line drawing to create a straight section of line. Straight and non-straight lines can be mixed by pressing and releasing Ctrl.
All shape drawing modifiers can be used with terraform presets. For example, to quickly wall off a structure you could press Alt + M then hold Alt + Ctrl and Left-click the structure.
Advanced Ramp[edit]

The full Ramp can make a slope between any two points above or below the terrain. Here is the process.
- Hold Ctrl and Left-click and drag to set the start height, then release. If you want to start at the height of the terrain, then just Left-click.
- Move the mouse to where you want to end the ramp, without holding any buttons.
- Left-click and drag to set the end height, then release.
- Move the mouse to set the width, then Left-click to issue the command.
A few modifiers are available.
- Hold Alt instead of Ctrl for the first click to snap the height to just below water level, which is helpful for getting hovercraft out of the water.
- Hold Alt when setting the height of the end of the ramp to snap to useful heights and gradients. These are the maximum bot pathable slopes, the maximum vehicle pathable slopes, flat, the original ground height, and just below water level.
The ramp colour indicates whether all units will be able to use it, if vehicles/tanks will not be able to use it and if only spiders can use it.
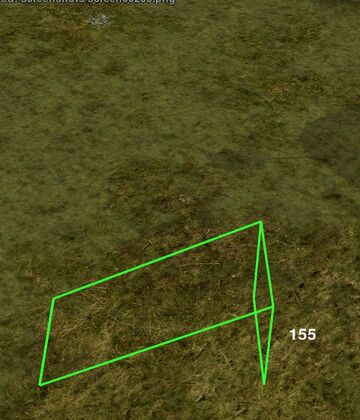
Green: Every land unit can use.
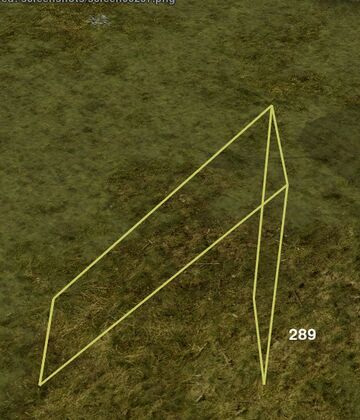
Yellow: Too steep for vehicles.
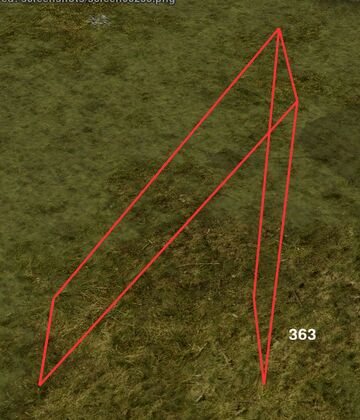
Red: Only spiders can climb.


Construction Cost[edit]
A few factors determine terraform cost so it is difficult to estimate precisely. Here are some common shapes that all cost around 300 metal and energy.

Large terraform shapes are split up into segments which track cost and progress independently. The cost of a segment has three parts:
- A small base cost, paid before any terrain is moved.
- A relatively high cost on height added or subtracted around the edge of the shape, capped at a height of 14.
- A cost per volume added or subtracted. The volume cost is paid for the buttress that builds up around large height differences as well.
The costs are balanced to make a wide range of interesting terraform shapes balanced and cost effective. The perimeter cost keeps bulky areas reasonably priced compared to thin walls, and the height cap on thin walls allows short vehicle-blocking walls to be relatively expensive for the volume they move. The main cost of thin high spires or deep holes is the volume cost for all the buttressing.
Combat Construction[edit]
Terraform takes 20× longer if you can see an enemy unit or structure near the terraform construction point. The area around the point is always large enough to cover the whole segment. This prevents most uses of terraform in close quarters combat (burying enemies etc), but still allows walls and holes to be dug for damage mitigation in long range exchanges. A tanky structure, such as a Razor, can be placed on a wall to stop enemies tearing it down with constructors, although it will only block weapon-based deformation under its footprint.

Tips[edit]
You can protect structures that don't care whether they are underground, such as cloak/shield generators, nanoturrets, Gunship Plants and Missile Silos, with walls or holes.
Buildings cannot be moved vertically once placed. If you want to put a Fusion in a hole for safety the hole will have to be built before the Fusion.
Big Berthas, Crabs and Ogres are very good at knocking down walls. Quake missiles are the ultimate solution against landscape designers, and are even able to move buildings vertically.

You can use terraforming to make a trench or wall underwater to stop amphibious bots.
Lobsters can throw units over low walls.
Terraform ramp can be used with Newtons to fire units at the enemy!

| Basics | |
|---|---|
| Units | |
| Unit abilities and features | |
| Other features | |
| Other information | |
| Strategy | |
| Development/Modding | |