Difference between revisions of "ZK Map Making Guide"
m (→SpringMapEdit) |
(→Upload) |
||
| Line 109: | Line 109: | ||
* Your map isn't set up right. Test it locally again and make sure your map works. | * Your map isn't set up right. Test it locally again and make sure your map works. | ||
* Something on the server has gone wrong. AFTER testing your map locally and finding that it works there, contact an admin. Uploading your map to a file-sharing service so the admin can look at it may help. | * Something on the server has gone wrong. AFTER testing your map locally and finding that it works there, contact an admin. Uploading your map to a file-sharing service so the admin can look at it may help. | ||
| − | |||
| − | |||
| − | |||
| − | |||
| − | |||
| − | |||
= Skeleton Of A Map = | = Skeleton Of A Map = | ||
Revision as of 16:35, 25 July 2023
Also see:
- Map Creation
- Advanced guide using WorldMachine, by Beherith
DISCLAIMER: This guide is a work in progress (particularly with respect to using particular pieces of software) but the basic framework here should give you a good start.
Minimal Brief Guide
For more detail on each of these steps read the later sections of the document.
This guide assumes that you are using a version of Zero-K installed through Steam. You can still make maps if you installed by some other method but you may need to modify some of the later steps.
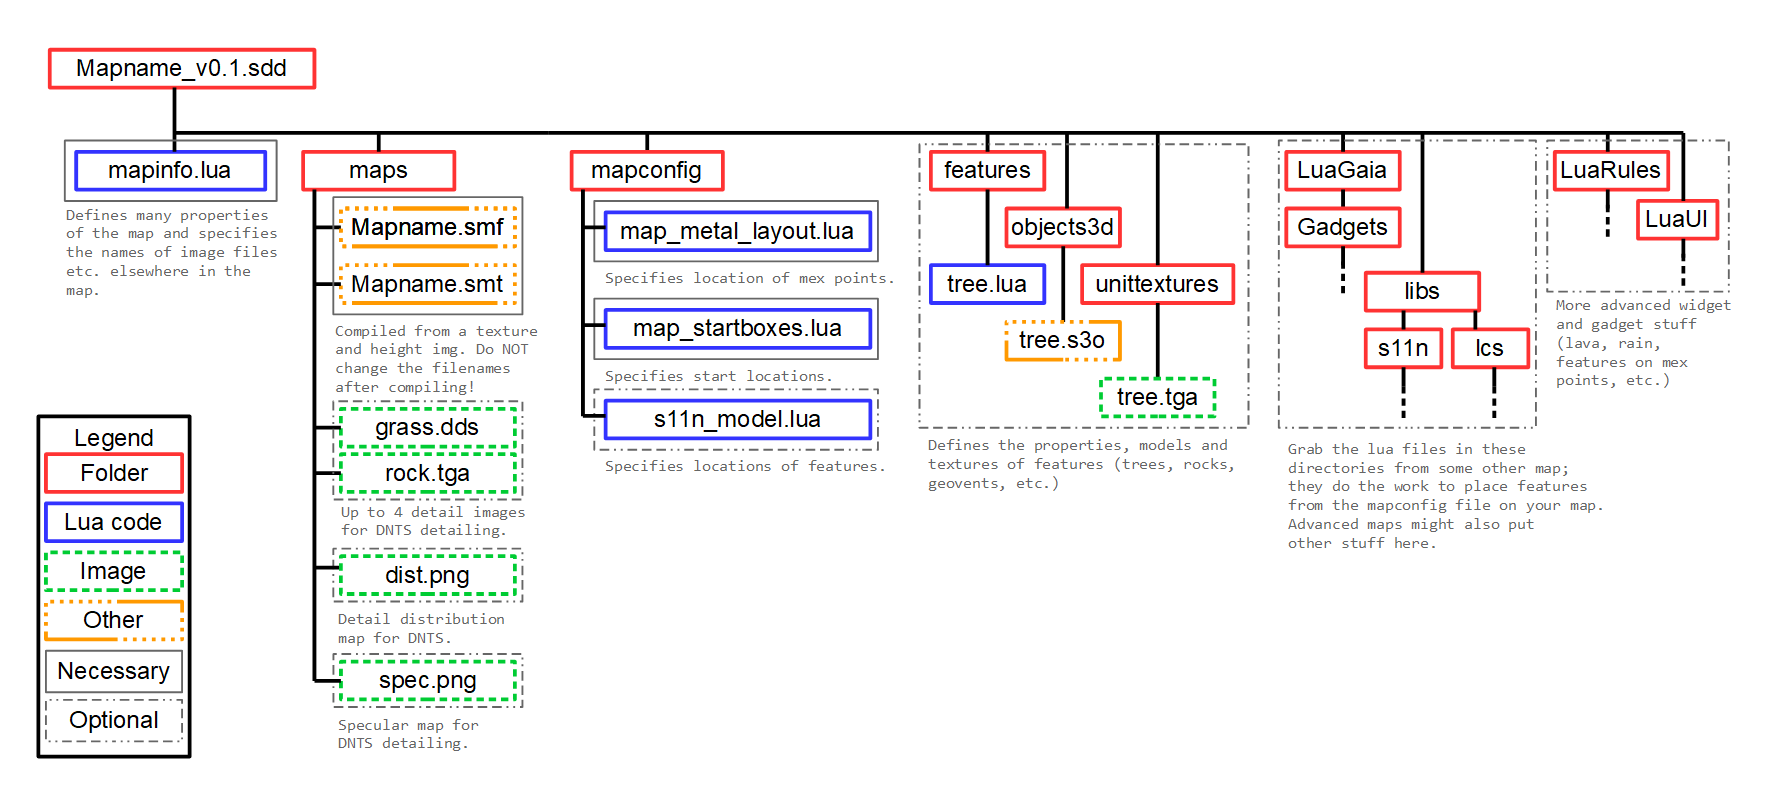
If you want to see what the map's file structure is meant to look like overall, scroll to the [Skeleton Of A Map] section. It's also a good idea to un7zip some existing maps and take a look to see how they are set up (and borrow anything which seems useful for your map).
Download Tools
- 7zip - https://www.7-zip.org/download.html
- pymapconv - clone or download https://github.com/Beherith/springrts_smf_compiler somewhere, then copy pymapconv.exe and nvdxt.exe to a new directory to keep things simple
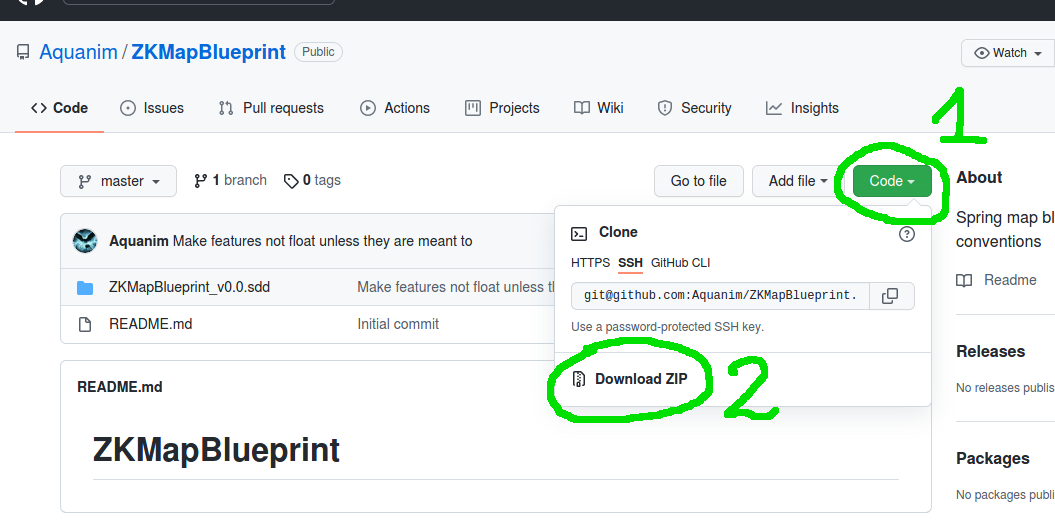
- map blueprint - clone or download https://github.com/Aquanim/ZKMapBlueprint
Create Images
For a 10x10 (TitanDuel-size) map, create the following images with a tool of your choice:
- A height map grayscale image with dimensions 641 x 641, saved as an 8-bit .bmp or a 16-bit .png. (The latter is preferred but not all tools offer 16-bit output.) The brighter a pixel is the higher the corresponding part of the map will be.
- A texture map colour image with dimensions 5120 x 5120, saved as a .bmp
For a different size map, multiply the height/width of the map by 64 and add 1 to get the right size for the heightmap; multiply the height/width of the map by 512 to get the right size for the texture map.
Different image formats might work but are just as likely to cause difficult-to-diagnose errors.
Put these images in the same directory as pymapconv.exe from the previous step (may not strictly be required but keeps things simple).
Useful tools: Spring Map Edit (SME), Springboard, TerreSculptor, World Machine, GIMP, Blender, any image editing software really
Compile Your Map
Run pymapconv.exe and fill in the following fields...
- An output file name - ideally this should be the name of your map, possibly with a version number. File extension .smf, will also generate a .smt. IMPORTANT: Do not rename these files after compiling!
- Use the buttons to select the texture and heightmap images you made in the previous step.
- I expect the minimum/maximum height values to be overridden by mapinfo.lua later but you might as well set them.
- Scroll down to the NVDXT option and make sure it says "-Sinc -quality_highest". Also probably a good idea to tick the CLEAN option.
- Untick everything else, press "Save options as" if you like, then press the "Compile" button.
Troubleshooting:
- If your map's minimap looks like it is from an old version of your map or a different map entirely, there is probably an old minimap file which the compiler is reading. In the directory where your compiler .exe is, delete any images which look like a minimap (probably something like mini.bmp and/or mini.dds) then recompile.
- If your map texture looks all pinkish ingame you probably renamed the .smf and .smt files. Regenerate them and be extra sure not to rename them this time. If the issue persists there might be other reasons this can happen, consult the #zkmap channel.
Construct .sdd File
- Rename ZKMapBlueprint_v0.0.sdd to have the name of your map. A version identifier is advisable as well. Keep the .sdd extension.
- Copy the .smf and .smt files produced by pymapconv.exe into the /maps subfolder of the .sdd folder. (There should be mapblueprint.smf and mapblueprint.smt files here, you can delete them.)
- In the root of the .sdd folder there should be a file "mapinfo.lua". Open this with a text editor. This file contains a bunch of stuff but there are only a few items we are interested in for now:
- Near the start of the file change the author, description, name, shortname and version variables to suit you and your map.
- Scroll down a bit to the "smf" section and change the maxheight and minheight numbers to suit your map. Also change the file name after smtFileName0 so that it has your .smt file's name.
- To test your map, copy the .sdd directory into the /maps folder of your Zero-K install. In the settings make sure that "Only featured maps" is disabled. Then open a Skirmish game, click on the current map, select your map from the list, and play. (You might want to make the enemy AI inactive. The minimap in the lobby will be blank, don't worry about this for now.)
- If you want to change your map you will need to replace the files in your ZK maps folder, then restart ZK, in order to load the new version.
Metal and Startboxes
Now that you can look at your height and texturemap ingame this is a good time to sort out your metal spots and start locations.
Metal spots
In the /mapconfig subfolder of the .sdd file there is a "map_metal_layout.lua" file. The blueprint contains two metal spots as an example; replace them with your own.
Startboxes
In the /mapconfig subfolder of the .sdd file there is a "map_startboxes.lua" file. This specifies each team's startboxes as well as default start locations.
Some hints for configuring the metal and startbox files:
- Startboxes are specified by their corner points reading clockwise around the polygon. More than one separate box for a given team is possible.
- Holding SPACE ingame will display a dialog box which (among other things) gives the X and Z coordinates of wherever your cursor is.
- The metal and startbox files are just LUA scripts. This means you don't have to write simple numbers to specify locations; you can perform arithmetic to make sure your map setup is symmetric (the startbox of the South-East team in the blueprint is an example). More advanced scripting is also possible, for example to make your startbox configuration dependent on the number of players or allyteams. See the [Startbox API page] .
Useful Tools
[Startbox Editor Widget] [Metal Spot Placer]
Optional Extras
Scroll down to section 3 to see how to add...
- Features (geovents, trees, rocks, etc)
- DNTS (fancy map details and specular map)
- Fancy mapinfo stuff (lighting, water effects, etc)
- Skybox
- Other nonsense (particle effects, sound, etc)
- Lava
Upload
Compress the contents of the .sdd file into a 7z, then change the file extension to “.sd7”.
If you remove the .sdd from your game maps directory and put the .sd7 in its place, the map should still work. It is a good idea to test the .sd7 before uploading since there are several *very* easy mistakes to make in the compression process.
IMPORTANT: Make sure that when you open the archive you see mapinfo.lua and not your .sdd folder! If you get this wrong the map will not work correctly. If you get an error saying that a .smd file is missing this is probably the problem.
IMPORTANT: When you compress to 7z make sure the compression is “non-solid”. If using 7zip this is done by setting the "Solid Block size" option to "non solid".
Uploading to Zero-K Server
- Go to https://zero-k.info/Maps
- Scroll down until you find the "Upload map or game (sd7 or sdz):" file on the right-hand side
- Upload your map
- Test your map on the live server so there is a publically accessible replay or two - games against AIs are fine
- Ask a moderator to support/feature your map (they will also tag it as 1v1/teams/hilly/flat/whatever as appropriate)
If the upload step doesn't work there are two potential reasons:
- Your map isn't set up right. Test it locally again and make sure your map works.
- Something on the server has gone wrong. AFTER testing your map locally and finding that it works there, contact an admin. Uploading your map to a file-sharing service so the admin can look at it may help.
Skeleton Of A Map
All you *really* need is the stuff in solid grey boxes: mapinfo.lua, .smf and .smt files, a metal layout, and a startbox config.
(Note: Some of the things labelled as "necessary" probably technically aren't; there are many ways to construct a map that Spring will accept. This guide will walk you through one that should be reasonably coherent and up to date.)
Tools and Resources
Springboard
Springboard Tutorial on this wiki (under construction)
Installation
Github page Scroll down to the "Installing" section and get the appropriate installer.
SpringMapEdit
No safe link to this known as of Jul 2023. RIP
Nobiax Texture Pack
Startbox Editor Widget
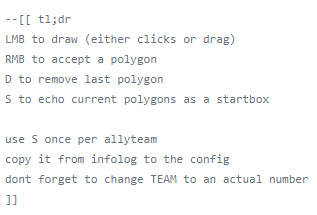
Load your map in ZK, press Alt-F11 to access the widget list, press "Search" and enter "Startbox". Enable the Startbox Editor widget. The ingame description doesn't say much so let's consult the widget source file:
...well, that's not a good sign. Scroll down a bit further:
That's more like it. Follow those instructions to create your startboxes, then open your infolog.lua (in the main zero-k directory) after you exit to retrieve the startbox information for copying into map_startboxes.lua. It's probably a good idea to turn the widget off after you are done with it.
Metal Spot Placer
Load your map in ZK, press Alt-F11 to access the widget list, press "Search" and enter "Metal Spot". Enable the Metal Spot Placer widget. As per the ingame description:
- Press Alt-M to enable the widget
- Click in locations on the map to place metal points
- Press Alt-M again to disable the widget and print a list of metal points to the infolog
Then open your infolog.txt (in the main zero-k directory) after you exit to retrieve the startbox information for copying into map_metal_layout.lua. Check that the metal point values for each mex point are as you want them to be. It's probably a good idea to turn the widget off after you are done with it.
Upspring
A tool for modifying models like those of tree features, etc. Might be useful if a feature is too large, too small, or not centered properly. I'll leave this guide to somebody who actually understands modelling.
Other Stuff
Features (geovents, trees, rocks, etc)
This method of placing features requires you to have some s11n gadgets in /LuaRules/Gadgets and some s11n and lcs stuff in the /libs/ folder. If your map doesn't have these then get them from the blueprint or some other map.
- Put the files defining the features you want in your map file. This includes a definition in the /features subdirectory, model files in the /objects3d directory, and textures in the /unittextures directory. The easiest way to get these is to borrow them from existing maps. There is a features library as well... ask around in #zkmap for a link then update this page.
- Load your map in Springboard
- Delete any features you have marking mex locations, otherwise you will end up with two copies of them and that is bad.
- Place features using Springboard.
- Open the "Export" window in Springboard, choose a file name, set the file type to "s11n object format" and export the file.
- The file will (probably?) have been exported to <springboard exe directory>/data/springboard/exports - copy this s11n file to the ./mapconfig subdirectory of your map.
- Make sure that in ./libs/s11n/s11n_load_map_features.lua that the "modelPath" variable points at your s11n file.
Troubleshooting:
- IF your features do not move when the ground under them is terraformed (a particular problem for geovents) go to ./libs/s11n/features_s11n.lua, look for the "CreateObject" function, and change it so that SetFeatureMoveCtrl is not being used to set MoveCtrl to true.
DNTS
If you don't use DNTS but you do set detailTex in the "resources" section of mapinfo.lua then you will get some general detail map. This works better than flat colour but we can get fancier.
- Put the .dds or .tga files defining the detail map (commonly grass, pebbles, rocks, etc.) you want in your /maps subdirectory. Again these are most easily found by borrowing from other maps. This page has some that may work (possibly with some effort).
- In mapinfo.lua, in the "resources" section, set splatDetailNormalTex1, splatDetailNormalTex2, splatDetailNormalTex3, splatDetailNormalTex4 to point to your detail files. These will in order be defined by the red, green, blue and alpha channels of your distribution image.
- Set splatDistrTex to point to your distribution image. This defines where each detail type appears on your map. This image will be stretched over your map; powers of two in the resolution are advised.
- Set specularTex to point to your specular image; what colour of light will be reflected from each part of the map. It is easy to go overboard with this so taking your texture map, darkening it significantly (or possibly increasing its transparency), and tuning from there is an okay strategy. Again, this image will be stretched over your map; powers of two in the resolution are advised.
- There is also some lightemission thing that I have not used and don't really understand here. The example image looks like Otago so try asking TheMooseIsLoose for advice?
Water and lighting settings
I'm not an expert, tune these for yourself until it looks good. Try reading these pages.
Skybox
Borrow one from some other map then set it in mapinfo.lua, atmosphere section, variable "skyBox". If you want to make one yourself apparently pymapconv can put it in the right format.
Particle and sound effects
Find a map that does the thing you want to do, look at how that map did it. For reference some fairly simple examples can be found in Rogues River (sound effects), Aurelian (precipitation), and Mercurial (plumes from the water).
Lava
Good luck... I'm not sure anybody has come up with an entirely bug-free implementation of this yet. Banana Republic might be your best bet for a reference.
Lobby/Website minimap image
This minimap image is generated from your map's texture, but unlike the ingame minimap does not have water drawn on it. If you would like your map's lobby/website image to be different, you need to create replacement images and provide them to somebody with the appropriate server access to overwrite the existing minimaps (not just any admin can do this; you are probably most likely to get a quick response from Aquanim or Anarchid). Ideally you only want to do this once, so wait until your map is up to a final release version before making the replacement image.
Required images for a map called "map name v1.0":
- A minimap image with the name map_name_v1.0.minimap.jpg with maximum height/width 1024.
- A thumbnail image with the name map_name_v1.0.thumbnail.jpg with maximum height/width 96.
IMPORTANT: Replace any spaces in your map name with underscores.
Find the default images for your map on the server to figure out reasonable dimensions. Screenshotting your ingame minimap and then rescaling it is a reasonable way to get a minimap image with water on it.


